Design
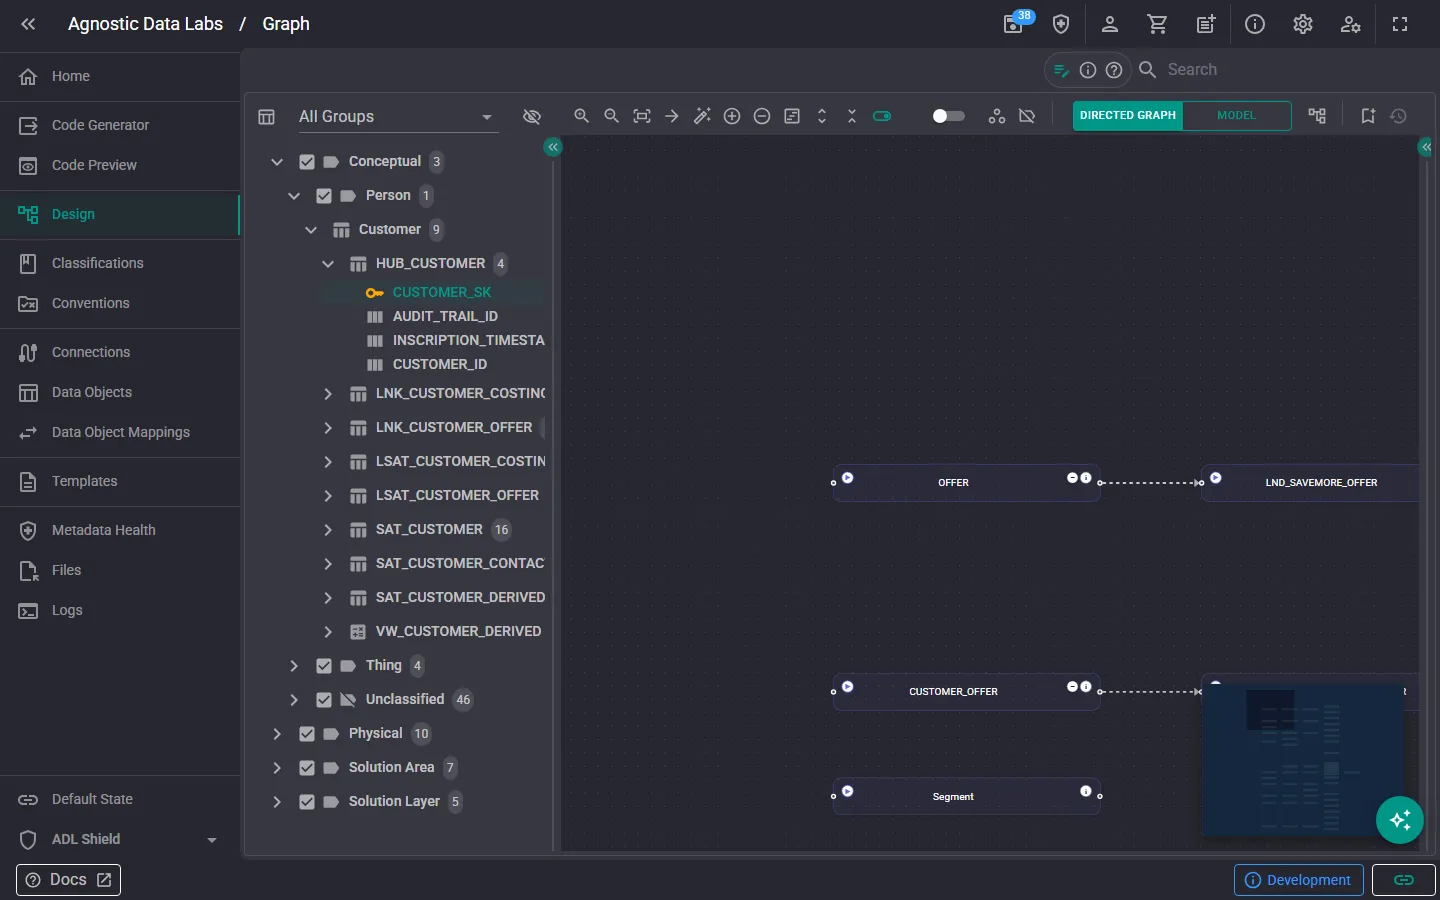
account_tree The Design screen gives you a visual, interactive map of your data solution. Instead of browsing objects one by one in a list, you can see your entire data model — tables, relationships, and connections — laid out as a diagram you can edit directly.
Two ways to look at your model
Section titled “Two ways to look at your model”The toolbar lets you switch between two display modes:
- In Directed Graph mode, objects appear as compact nodes with relationship arrows between them. Best for understanding flow and dependencies at a glance, especially in larger models.
- In Model mode, you get an ERD-style (entity-relationship) view with full table shapes: columns, data types, and keys. Best for detailed modeling work.
Personas can set a default mode, so different audiences land on the view that suits them — see Personas.
Containment in Model mode
Section titled “Containment in Model mode”In Model mode, objects linked by a contains relationship are drawn nested inside their parent — a business concept becomes a container that holds its member objects, with multi-level nesting supported. The contains edge itself is hidden; the nesting is the representation. The tree navigator on the left mirrors the same structure.
You can drag objects into and out of containers to change containment directly on the canvas. See Containment & Child Objects for the full story.
What you can do here
Section titled “What you can do here”Visualize and navigate
Section titled “Visualize and navigate”- Pan and zoom to navigate around large models.
- Use the checkboxes in the left-hand tree navigator to control which objects are shown, and switch between Data Objects and Mappings.
- Click a data object to select it and view and edit its details in the side pane.
- Drag objects to organize the layout, or apply an automatic layout: Hierarchical (Dagre), Layered (ELK), Radial, or Force-Directed.
- Toggle auto-grouping to organize nodes by classification.
- Collapse a group to roll its internal relationships up into a single aggregated edge, with a badge showing how many relationships it represents.
Edit the model directly
Section titled “Edit the model directly”The Design screen isn’t just for viewing — you can author metadata on the canvas:
- Create relationships by dragging: in Model mode, drop a column onto another table’s header to create that column on the target and author a column-mapped foreign-key relationship in one action.
- Double-click a description to edit it in place. Nodes can switch between showing their columns and showing their notes/description.
- Business concepts styled as sticky notes can sit on the canvas as lightweight annotations, and act as containment targets for grouping related objects.
Tune what’s displayed
Section titled “Tune what’s displayed”- Turn on the Ordinals switch to show column position numbers (Directed Graph mode).
- Toggle Edge labels to show or hide relationship labels on the arrows (Directed Graph mode).
- Use the Data types setting to show or hide column data types (Model mode).
How relationships are typed, colored, and labeled is driven by the project’s relationship rules.
Save perspectives
Section titled “Save perspectives”You can save specific views as perspectives, which are named layouts with specific positioning, zoom levels, and visible objects. This lets you:
- Save different views for different audiences (e.g., a “Source System” view and a “Data Vault” view).
- Quickly switch between perspectives without rearranging the diagram each time.
Use the bookmark button in the toolbar to save the current view, and the adjacent menu to load or manage saved perspectives. See Perspectives.
When to use the Design screen
Section titled “When to use the Design screen”- When you first open a project, the diagram gives you a quick overview of what’s there and how it’s structured.
- Group objects into concept containers to communicate the business view of the model alongside the technical one.
- See at a glance which objects are connected and spot any missing or unexpected relationships.
- The visual format is great for sharing your data model with colleagues or stakeholders in presentations and discussions.
- Hub, Link, and Satellite relationships in a Data Vault are much easier to understand when you can see them visually.
- Save perspectives for views you come back to often — it saves time and keeps your team aligned.
- Use Model mode for detail, Directed Graph for overview. Switching modes is instant and each remembers its own display settings.
- Use the Design screen alongside other screens: it’s great for orientation and structural edits, while the Data Objects screen is better for detailed editing.
Related
Section titled “Related”- Data Objects — Edit the objects shown in the diagram
- Data Object Mappings — Define data flow between objects
- Configuration — Relationship rules that control how edges are typed and drawn
- Perspectives (Concepts) — Saved views of the diagram
- Metadata & Data Objects (Concepts) — Understand the metadata model